

The Best Paint Brands for Interior Home Painting in 2025
Whether you're giving your living room a fresh look or updating the entire interior of your home, choosing the right paint brand can make all the difference. Great interior paint should offer durability, excellent coverage, low odor, and a beautiful finish that lasts for years.
Here are some of the best paint brands in 2025 for painting the inside of your home—trusted by homeowners and professionals alike.
1. Benjamin Moore
Top Choice For: Premium finish & color richness
Popular Line: Regal Select, Aura
Benjamin Moore paints are known for their superior coverage and smooth finish. The Regal Select line offers a mildew-resistant finish that’s perfect for bathrooms and kitchens. The Aura line is ideal for bold colors and high-traffic areas thanks to its extreme durability.
✅ Pros:
Excellent hide and coverage
Low-VOC and low odor
Wide selection of designer-approved colors
2. Sherwin-Williams
Top Choice For: Professional results & ease of use
Popular Line: Emerald, SuperPaint, Duration
Sherwin-Williams is a favorite among professional painters and serious DIYers. The Emerald line provides stain-blocking, washable finishes, while SuperPaint balances quality and value perfectly.
✅ Pros:
Great application and touch-up ability
Resists fading and stains
Available at thousands of locations nationwide
3. Behr
Top Choice For: Affordable quality (Home Depot exclusive)
Popular Line: Marquee, Premium Plus
Behr's Marquee line is known for one-coat coverage and long-lasting durability. If you're on a tighter budget, Premium Plus is still a reliable low-VOC option that performs well in most rooms.
✅ Pros:
Excellent for DIY projects
Budget-friendly
Easy to find at Home Depot stores
4. Valspar
Top Choice For: Smooth finish & color retention
Popular Line: Signature, Reserve
Valspar, available at Lowe’s, delivers excellent value and solid performance. The Signature line includes ScuffShield™ Technology for extra durability, ideal for high-traffic areas like hallways or kid’s rooms.
✅ Pros:
Wide selection of colors
Fade and scrub resistant
Good coverage at a competitive price
5. Farrow & Ball
Top Choice For: Luxury finish & high-end aesthetics
Popular Line: Modern Emulsion, Estate Emulsion
If you're looking for rich, matte finishes and unique color tones, Farrow & Ball is a go-to. It’s pricier than other brands, but ideal for accent walls or feature rooms where you want a designer touch.
✅ Pros:
Beautiful depth of color
Eco-friendly and low-VOC
Great for statement rooms
🛠 Tips for Choosing the Right Interior Paint:
Match paint type to the room: Use washable finishes in high-traffic areas and moisture-resistant paints in kitchens/bathrooms.
Use samples before buying: Lighting can drastically change how a color looks.
Check for VOC levels: Look for low- or zero-VOC formulas for better indoor air quality.
Don’t skip the primer: Especially important when changing from dark to light colors.
🎯 Final Thoughts
The best interior paint depends on your budget, project needs, and aesthetic goals. For most homeowners, Benjamin Moore or Sherwin-Williams offers a great mix of professional quality and long-term performance. If you're working with a tighter budget, Behr and Valspar are solid contenders with strong results.
Whichever brand you choose, investing in high-quality paint pays off with better coverage, easier cleanup, and a longer-lasting finish.
Want help picking a color palette or estimating how much paint you need for your next project? Let us know—we're happy to help!

How to Start and Grow a Profitable Home Service Business
Step 1: Choose Your Niche Wisely
Before diving in, decide on the specific service you want to offer. Here are a few in-demand options:
House cleaning or deep cleaning
Lawn care and landscaping
HVAC repair or maintenance
Plumbing and electrical
Handyman or remodeling
Pest control
Window washing
Junk removal
Tips for choosing:
Consider your experience or skills
Start with services that require minimal licensing or expensive equipment
Research local demand using Google Trends, Facebook groups, and local marketplaces
Step 2: Make It Official
Register your business and ensure you comply with local and state regulations.
Checklist:
Choose a business name
Register an LLC or sole proprietorship
Get the necessary licenses/permits (varies by state and service)
Purchase liability insurance
Open a business bank account
This protects your personal assets and builds trust with customers.
Step 3: Set Up Your Operations
Invest in the tools, systems, and software you need to deliver a professional service.
Must-haves:
Service vehicle (clean and branded if possible)
Tools and supplies relevant to your trade
Business phone number and email
Booking system or scheduling software (Jobber, Housecall Pro, or Google Calendar can work)
Payment system (Square, QuickBooks, or Zelle)
Step 4: Get Your First Clients
Here’s how to land your first few jobs:
Friends & Family – Offer a discount or free service in exchange for referrals and reviews
Flyers & Door Hangers – Old-school but effective, especially in tight-knit neighborhoods
Facebook Groups & Nextdoor – Post helpful content and offer intro deals
Google Business Profile – Set this up early and start collecting reviews
Local Directories – Yelp, Angi, Thumbtack, TaskRabbit, etc.
Your goal is to build up early momentum and a base of happy customers who will spread the word.
Step 5: Build a Brand That Stands Out
Most home service companies blend together. Branding sets you apart.
Focus on:
A clean, memorable logo
A professional website (Squarespace, Wix, or WordPress work well)
Consistent uniforms and vehicle signage
Prompt communication and excellent service
Word of mouth and reviews will do the heavy lifting—make it easy for people to recommend you.
Step 6: Systemize and Scale
Once you’re consistently busy, start building systems so your business can grow without burning you out.
Ways to scale:
Hire and train employees or subcontractors
Use software to automate booking, follow-ups, and invoicing
Create standard operating procedures (SOPs)
Invest in SEO and local advertising
Upsell recurring services or bundles
Don’t just build a job for yourself—build a business that works even when you're not on-site.
Final Thoughts:
Starting a home service business doesn’t require a big investment—but it does require hustle, consistency, and a focus on quality. If you’re good at what you do and treat people right, your reputation will grow—and so will your business.
So whether you're a skilled tradesperson or just someone who wants to help people maintain their homes, there's never been a better time to get started.
Ready to launch your business?
Start small, stay focused, and deliver top-tier service. The rest will follow.

How to Choose the Right Interior Paint Color for Your Home
🎨 How to Choose the Right Paint Color for Your Interior Walls
Choosing the perfect paint color for your home isn’t always as easy as picking your favorite shade. The right color can brighten a room, set the mood, and even make your space feel larger or more inviting. But with thousands of options out there, how do you narrow it down?
Here are a few professional tips to help you confidently choose the right interior paint color:
1. Start With the Mood
Before diving into paint chips, think about how you want the room to feel:
Relaxing and calm? Try cool tones like soft blues, greens, or muted grays.
Warm and cozy? Go for rich earth tones, warm beiges, or soft terracotta.
Bright and energizing? Consider light yellows, crisp whites, or pastel tones.
Your paint color should support the atmosphere you want to create.
2. Factor in Natural Light
Lighting plays a big role in how a color appears:
North-facing rooms can look cooler, so warmer tones work best.
South-facing rooms get warm, natural light—so most colors look good.
East-facing rooms may show cooler light in the morning.
West-facing rooms will feel warmer in the afternoon.
Always test paint samples on multiple walls and observe them at different times of the day.
3. Consider Your Existing Décor
Take cues from the fixed elements in your home—flooring, cabinets, countertops, furniture, and even art. If your furniture has bold patterns or colors, choose a more neutral wall color to balance the room.
If you’re starting fresh, you have more flexibility—but it’s still smart to create a cohesive color palette.
4. Don’t Rely on Paint Chips Alone
Paint chips in the store can be misleading. Always test at least 2–3 actual paint samples on your walls at home. Look at them in daylight and under artificial light to see how they truly appear.
5. Use the 60-30-10 Rule
Designers often use this simple formula:
60% dominant color (usually walls)
30% secondary color (furniture/upholstery)
10% accent color (pillows, artwork, accessories)
This helps you build a well-balanced, visually pleasing color scheme.
6. Still Not Sure? Ask a Pro
A professional painting service can help you choose the perfect color for your space based on lighting, architecture, and your personal style. At Groutacular, we not only deliver clean lines and flawless finishes—we’re happy to consult on color selection to make sure you love the results.
Ready to Refresh Your Home?
📞 Call today: 561-654-4811
🌐 Schedule your free estimate at: www.groutacular.com
#InteriorPainting #PaintTips #HomeColorInspiration #GainesvilleFL #Groutacular #HomeImprovement #PaintColorIdeas #ColorConsulting #HomeRefresh #PaintingContractor

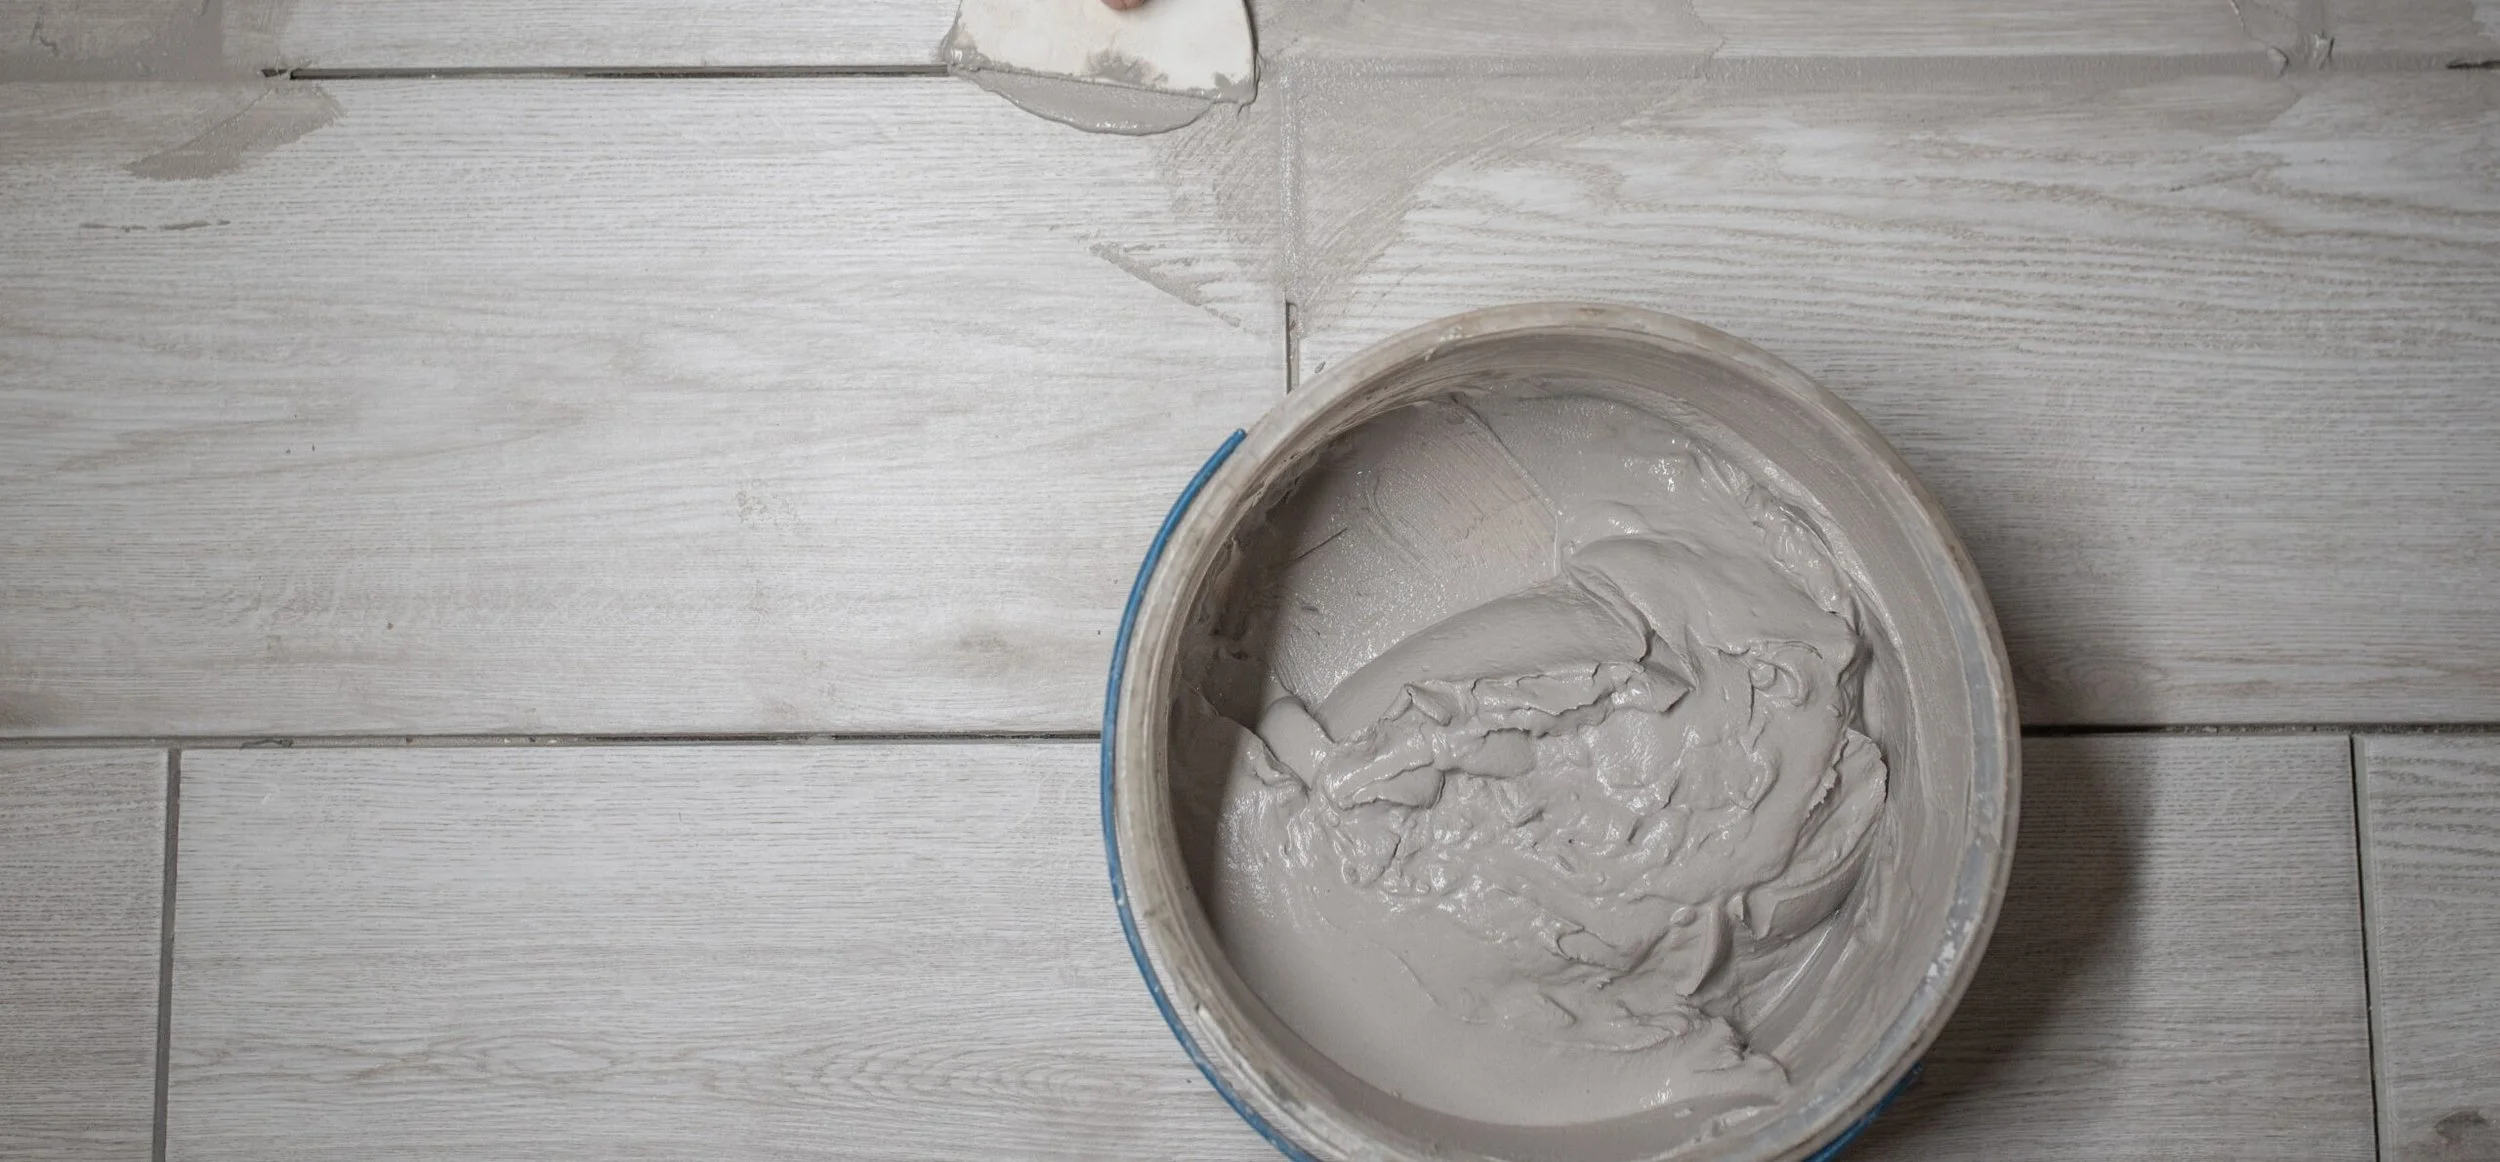
How to Repair Loose and Cracked Grout Like a Pro
🛠️ How to Repair Loose and Cracked Grout (and When to Call in the Pros)
Grout is what holds your tile together — both literally and visually. But over time, it's common for grout to become loose, cracked, or even fall out completely. If you’ve noticed gaps, crumbling lines, or movement between tiles, it’s more than just a cosmetic issue — it’s a sign that your tile and grout may need attention.
So, what causes grout to crack or come loose, and how can you fix it? Let’s break it down.
🧱 Why Does Grout Crack or Loosen?
There are several common reasons why grout may become damaged:
Age and Wear: Like anything else in your home, grout can deteriorate over time due to foot traffic, water exposure, and daily use.
Improper Installation: If the original grout was mixed incorrectly or applied poorly, it’s more likely to fail early.
Structural Movement: Homes naturally shift and settle, especially in Florida's climate. This movement can cause grout to crack.
Water Damage: In bathrooms and showers, moisture can seep into unsealed grout and weaken its structure, leading to loose or crumbling joints.
🔧 How to Repair Loose or Cracked Grout
Here’s a general outline of the grout repair process:
1. Remove the Damaged Grout
Using a grout saw or oscillating tool, carefully scrape out the cracked or loose grout. Be cautious not to chip your tiles. This step ensures the new grout will bond properly.
2. Clean the Area Thoroughly
Vacuum or wipe out all dust and debris from the grout lines. If any mold or mildew is present, treat the area with a mold remover or bleach solution and allow it to dry completely.
3. Regrout the Area
Mix new grout according to manufacturer instructions (or better yet, let a pro handle it for perfect consistency). Apply it evenly using a rubber float, pressing it firmly into the joints.
4. Wipe Away Excess Grout
Once the grout has set slightly, wipe the tiles clean with a damp sponge. Be careful not to pull grout out of the joints.
5. Let It Cure, Then Seal It
Allow the grout to cure fully — usually 24 to 72 hours. Then, seal the grout to protect it from future water damage, stains, and cracks.
🧽 What If You Want a Stronger, Longer-Lasting Finish?
After repairing your grout, we highly recommend applying a grout color sealer. Not only does it make your grout lines look brand new — it adds a waterproof, stain-resistant barrier that keeps your grout from cracking or discoloring again.
🛠️ DIY vs. Professional Grout Repair
While minor grout cracks can sometimes be patched with a little patience and elbow grease, professional repair offers lasting results — especially if:
Large areas of grout are damaged or missing
Your tiles feel loose or hollow
You're seeing water damage or mold
You want a cleaner, more uniform finish
At Groutacular, we specialize in grout repair, regrouting, and color sealing for both homes and businesses. We don’t just patch it — we restore it to like-new condition, and seal it to last.
📍 Serving Gainesville and Beyond
If your grout is cracked, crumbling, or just making your tile look tired — let us bring it back to life.
📞 Call us today at 561-654-4811
🌐 Learn more or request a quote at www.groutacular.com
Groutacular Clean. Spectacular Results. 💪

Dirty Grout - The Health Hazards You Can't Ignore!
Hidden Dangers of Dirty Grout—and Why You Should Seal It
Grout is one of those things that often gets overlooked when we think about cleaning our homes. We scrub our countertops, wipe down the floors, and dust the shelves, but grout lines—especially in high-moisture areas like bathrooms and kitchens—tend to get neglected. The truth is, dirty grout isn't just unsightly. It can actually harm your health.
The Risks of Dirty Grout
Grout may look like a simple part of your floor or tile installation, but it’s a porous material that easily traps dirt, bacteria, and even mold. Over time, this build-up can cause more than just an aesthetic problem. When disturbed—whether by foot traffic or during cleaning—particles can become airborne and negatively affect your indoor air quality.
Here are some of the potential health risks of dirty grout:
Allergic Reactions: Dust and dirt can trigger allergies, leading to sneezing, coughing, or other respiratory symptoms.
Asthma Problems: Mold spores that grow in damp grout can aggravate asthma, causing wheezing, chest tightness, and shortness of breath.
Sinus Issues: The presence of mold and mildew can also irritate the sinuses, leading to headaches, congestion, and sinus infections.
Chronic Health Issues: Over time, prolonged exposure to mold or bacteria could lead to more serious health conditions, especially in sensitive individuals or those with compromised immune systems.
In short, dirty grout can be a serious health hazard—making it important to take action before things get worse.
Why Sealing Your Grout Is So Important
So, how can you protect your home and health? The answer is simple: seal your grout.
When grout is properly sealed, moisture, stains, and grime have a much harder time seeping in. The seal forms a protective barrier that keeps the grout clean, dry, and free from harmful bacteria and mold. This is essential not just for the cleanliness of your home, but for your well-being.
The Benefits of Color Sealing
If you want to take it a step further, consider color sealing your grout. Color sealing is a great way to restore or change the color of your grout while offering added protection. Here are some key benefits:
Prevents Stains and Moisture: Color sealing locks out stains, dirt, and moisture, helping to maintain your grout’s appearance and function.
Enhances Your Home’s Look: It restores your grout’s original color, or allows you to change it to complement your décor. This helps create a uniform, refreshed look for your floors.
Easier to Clean: Sealed grout is much easier to maintain. It resists dirt and grime, which means less scrubbing for you.
Long-Lasting Protection: Color sealing provides long-lasting protection, with results that can last for years—saving you time and money on constant grout cleaning.
Protect Your Home and Health
Sealing your grout isn’t just a cosmetic upgrade. It’s a simple yet effective way to maintain a cleaner, healthier home. If you’ve been neglecting your grout, now’s the time to address it before dirt, bacteria, and mold take hold.
At Groutacular, we specialize in grout sealing and color sealing to give your home the fresh, clean look it deserves. Plus, our services provide the added benefit of long-term protection, helping to create a healthier environment for you and your family.
Want to Learn More?
Visit our website at www.groutacular.com or call/text us at 561-654-4811 for a free consultation. We’re here to help with all your grout cleaning and sealing needs

Dangers of Not Sealing Floors
Why Leaving Your Floors Unsealed Could Be a Costly Mistake
When it comes to home maintenance, sealing your floors might not be at the top of your list—but it should be. Whether you have hardwood, concrete, tile, or natural stone flooring, leaving them unsealed can lead to a host of problems that impact not just the look of your home, but its safety, durability, and value.
Let’s take a closer look at why unsealed floors could be doing more harm than you think.
1. Water Damage Is Just a Spill Away
Unsealed floors are highly vulnerable to moisture. Water and other liquids can easily seep into the material, leading to:
Warping or swelling in hardwood
Cracking in concrete
Mold and mildew growth, especially in basements or bathrooms
Even everyday spills can become long-term problems without the protective barrier a sealant provides.
2. Stains Become Permanent Guests
Without a sealed surface, your floors absorb stains like a sponge. Red wine on tile, oil on concrete, or pet accidents on hardwood—once it soaks in, it’s almost impossible to remove. A proper sealant repels liquids and gives you a window of time to clean up before permanent damage occurs.
3. More Dust, More Allergens, More Problems
Unsealed floors tend to trap dust, dirt, and allergens deep in their pores or cracks. Not only does this make your home harder to clean, but it can also contribute to poor indoor air quality—especially for people with allergies or respiratory issues.
4. Decreased Lifespan of Your Floors
Your flooring is an investment, and unsealed surfaces wear down much faster. Foot traffic, furniture movement, and exposure to sunlight can cause:
Surface erosion
Discoloration
Uneven fading or patchy wear
Sealing acts as a shield that helps preserve the integrity and appearance of your floors over time.
5. It Can Lower Your Home’s Value
Floors are one of the first things potential buyers notice. Unsealed, damaged, or stained floors can reduce your home's appeal—and its resale value. A simple sealing treatment can boost both curb appeal and market value.
Why Seal Grout?
Grout plays a very important role with…
Grout plays a very important role with tile installation. Not only is it there for an aesthetic purpose, grout gives tile an extra form of strength and keeps dirt and debris from getting underneath the surface of the tile. But, nobody really pays attention to grout unless it is cracking or discolored. That is where sealers come into play. After grout has been laid, it is highly recommended to apply a sealer coat on top of the grout. We recommend a penetrating sealer over a topical forming sealer as the penetrating sealer has a lot more longevity to it. The topical sealer does not seep into the grout and only lays on the surface. The penetrating sealer actually absorbs into the grout and protects all throughout, not just on top of the surface. So, we ran through what grouts purpose is and also what you should seal it with. But, did you know that grout sealers come in a wide variety of colors? We tend to recommend sealing your grout with a color that blends in with at least one accent of your tiles. So if you have a light brown tile that has darker tints of brown in it you can use the main color of your tile or try and find a sealer that matches the color of one of the accents. It tends to blend better and make everything look as one and not a checker board look as some people don’t like. Most home builders don’t seal grout as it is a very tedious job. If your grout is dirty we recommend you cleaning your grout with a steam cleaner once to remove the dirt and then immediately seal it after. After you have sealed the grout you won’t need the steam cleaner anymore as with time the steam cleaner could end up breaking down the sealer. So steam clean once, seal, then bye bye steam cleaner. We here at Groutacular specialize in grout sealing, deep cleaning tile and grout, re-grouting, grout repairs, and replacing old caulking. We seal main floors, showers, backsplashes, and pavers! If you’re interested in taking advantage of our FREE sales quotes. Give us a call today. (561)654-4811. We serve all of Northeast Florida (From St. Augustine all the way to Ponte Vedra) as well as Alachua county.
We Treat Every Home Like It’s Our Own!
ReplyForward
Add reaction

Sanded v. Un-sanded Grout.
Sanded vs Un-sanded Grout…
Sanded vs Un-sanded Grout: Sanded grout is a form of grout that is good for large grout joints; a general rule of thumb is any grout space that is larger than ⅛”. The sand in grout helps grout stay in between the joints. Sanded grout comes in both dry and pre-mixed forms. Sanded grout is very versatile, and can be used in virtually any project whether inside or outside. Sanded grout does need to be sealed in order to properly protect against dirt, spills, and discoloration. Sanded grout cannot be used with certain stone materials, specifically marble, as the sand can scratch your stone. Unsanded grout is like sanded grout but made without sand. For smaller grout joints under ⅛”, use unsanded grout. You can’t use sanded grout in small joints because not enough grout will make up the space, instead being filled with too much sand. This can lead to instability. Unsanded grout is stickier than sanded grout — perfect for those smaller grout spaces. Like sanded grout, unsanded grout does need to be sealed to protect against damage caused by stains, spills, and even UV lighting.